|
Use of Psychology Poster Printer Facilities
**Important: Poster printing is available to Psychology
graduate students, faculty (and associated) members and
their graduate students only.**
Poster printer facilities are located in Room N7/2A of the
Stewart Building. The room is accessible with a "S" or "SS"
key.
We have a PC connected to the poster printer as well as a
paper trimmer for trimming the excess borders of the posters
after printing. Microsoft Office (PowerPoint 2010) and Adobe
Illustrator and Adobe Professional are currently available
for the PC.
Poster printer is available to all Psychology faculty, Grad
students, Post-Docs and RAs (those printing for faculty
members). Undergraduate students should ask a Psychology
grad student to print for them. Grad students must be
present in the room during the printing process if printing
for undergrads.
The charge for printing is $20 per poster, payable in cash
(no checks) to Morris Eichler (Room W8/9), or charged to a
faculty grant with faculty supervisor permission.
Please record all printing information requested and charges
in the log book next to the printer.
Instructions for the
HP DesignJet 800ps printer
Instructions
for the HP T1300 printer
Instructions for the HP DesignJet 800ps
printer
Printing from PowerPoint
Printing from Adobe Illustrator
Printing from PowerPoint
For faster printing copy the file to the desktop before starting
print job.
Step 1: Preparation
1) Open File to
Print
2) Check or
indicate poster size:
Click on the "Design" tab at the top of the screen, then click the
"Page Setup" icon on the far left within the tab options.

A Page Setup screen will appear. In the
"Slides sized for" option, choose Custom.
Then enter the actual size of the
poster for the height and width required. Maximum size for
PowerPoint cannot exceed 54.5 x 40.5 inches.
Step 2: Select
Paper Size
1) Click on File
> Print > Print - then select “Properties” beside HP
Design jet 800ps 42 by HP
2) Under Paper
Options,
3) Set
desired Paper size Width and Height
Click O.K.
Click O.K.
Step 3: Print Preview and Printing
1. Select Preview
in Print screen to make sure poster is O.K.
* Important: If
you get an error message or poster looks cut off or changed, resize
your poster or change orientation (landscape or portrait).
2. If Preview is
O.K. Select print (icon on top left side of page) or close Preview
and select File > Print > O.K.
Printing from Illustrator
For faster printing copy the file to the desktop before starting
print job.
Step 1: Preparation
1. Open File to
Print
2. Go to
File > Document Setup
-
Check Poster Size and orientation
-
Click OK
-
Depending on orientation selected, one of the poster sides
cannot exceed 40.5 inches
Step 2: Select Paper Size
1. Go to
File > Print
2. Click on Setup
3. Under Paper
Options,
4. Set
desired Paper size Width and Height
Click O.K.
Step 3: Printing
1. In Printing Preferences
check orientation you want (Landscape or Portrait). Click OK.
2. In Print Box
click “Print”
3. Check poster
for fit and orientation in Print Preview box (bottom left). Click
“Print”.
Icon of printer
should briefly appear on top left of screen to indicate poster file
has been spooled to printer.
Printing of
poster should take anywhere from 5 to 20 minutes.
Instructions for the HP T1300
printer
Printing from Adobe (PDF) Directly From Printer
Printing directly from the HP T1300 printer is possible for
Adobe (PDF) files if poster and paper size are preset in
your Adobe file.
·
Insert USB key into front right panel on poster printer.
·
On the touch panel window, select the USB Drive icon.
·
Select the file you wished to print, and press start.
·
File will process and then print.
Printing from PowerPoint
For faster printing copy the file to the desktop before
starting print job.
Poster will dry for 2 minutes before it is released.
Step 1: Preparation
1) Open File to Print
2) Check or indicate poster size:
Click on the "Design" tab at the top of the screen, then
click the "Page Setup" icon on the far left within the tab
options. See Fig.1
Fig.1
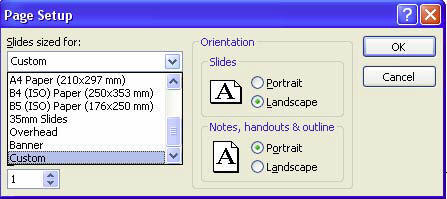
A Page Setup screen will appear. In the "Slides sized for"
option, choose Custom. See Fig.2
Fig.2
· Then enter the actual size of the poster for the
height and width required. Maximum size for PowerPoint
poster should not exceed 56 x 44 inches including borders.
· Click O.K.
· If paper size is already set up then go ahead and
print
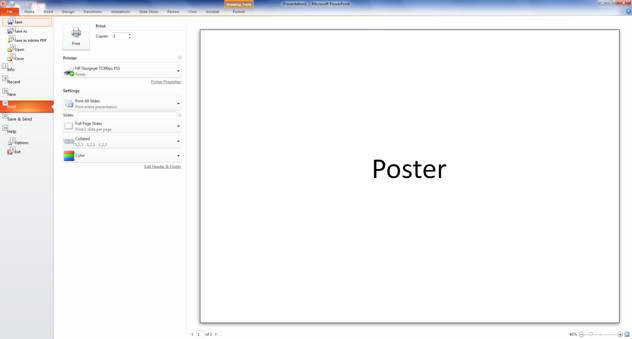
· Click on File>Print
· Check preview on right side for orientation and
accuracy.
· Click on the Print icon near the top of screen to send
poster to HP Designjet T1300ps PS3 printer.
· Continue to Step 2 if paper size needs to be set
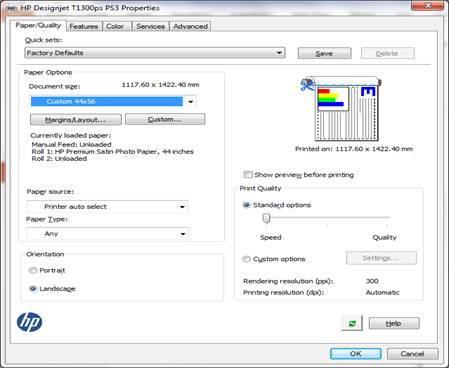
Step 2: Select Paper Size
Click on File >Print
Select Printer Properties underneath printer name
HP Designjet T1300ps PS3 printer
Set/Select desired Paper size Width and
Height:
See Fig.3
Fig.3
Method 1.
To Use Preset Measurement Settings for Paper Size
·
Click on dropdown menu
in Paper Options – Document Size
·
Click on More at
the bottom of list
·
Scroll to the bottom of
the next list and see if required measurement is created, if
yes, select the measurement.
·
Click OK
·
Click OK at the
bottom of the Properties screen.
·
Check poster orientation
and accuracy on preview screen.
·
Click on the Print
icon near the top of screen to send poster to HP DesignJet
T1300 printer.
Method 2
To Create a Measurement Setting for Paper Size
·
See Step 2
·
Select blue Custom button
·
Set both width and height to approx. 1.5 inches larger than
poster size. ( if no borders were set for the poster size,
this will set a ¾” border on each side). Maximum paper size
is 44”x 56”.
·
Type in a name (use measurement for name) for measurement
setting in the Name box.
·
Click “Save” then OK.
·
Click OK at the bottom of the Properties screen
·
Check poster orientation and accuracy on screen
·
Click on the Print icon near the top of screen to
send poster to
HP DesignjetT1300 printer.
Processing and printing of poster should take anywhere from
5 to 20 minutes.
For problems with printing contact:
Morris #8243 or Ernest #7439 |